Comparison of microprocessors and microcontrollers

Microprocessors and Microcontrollers

Here we will summarize our discussion about the structural point of view on the microcontrollers and microprocessor. In last some post we have detailed discussed the computers, microprocessors and microcontrollers. As we know that the Microcontrollers store their program code to be executed inside the MCU in the form of binary numbers which are actually the voltage levels of +5V and 0V to represent binary levels 1 and 0. The programs and software all uses the data in only two digits 1 or 0. One digit either 1 or 0 is called one bit and 8 such bits tighter are called byte. The program of microcontroller is normally stored in non-volatile ROM which is executed depending upon the information sequencing in set of instruction written in that program. The processor or CPU of microcontroller then operates the input or output devices attached in project and also stored data.

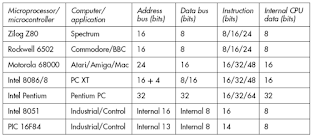
Now we will discuss the data processing capabilities of microcontrollers and microprocessors. The microprocessors while processing the data in execution of software or programs, usually execute these bits together. Some of the microprocessor are powered enough to handle the data 8 bits tighter and some do 16 bits together.  The larger microprocessors can handle the code in 8-bit binary words, or multiples of 8 bits. The two bytes tighter is called one word or data word. The data word size has increased with the passage of time as advancements in this field is continuous which also increase the complexity of the integrated circuits too. The capacity of execution of various microprocessors is discussed in the table below; here are these some examples because actual number of microprocessor is very much more.

The first generation of microprocessor based PCs popular as home computers were like the Commodore, Apple, BBC and Spectrum used 8-bit microprocessors. In these computers the information comprising of program and data words all of these were 8-bit based. Then the second generation of computers came like home games machines such as the Atari and Amiga. The second generation computers used the 16-bit word and mostly use the 68000 chip processor inside these computers. Similar kind of processor was also used in the Apple Mac. It may be noted that it was the first mass-produced computer to use a WIMP interface.

On the other hand the IBM PC which was a business-oriented personal computer. The IBM PC was designed to use the Intel 8088 processor. At that time the 8088 Intel processor could handle 16 bits inside the CPU on motherboard and only 8 bits external interfaces. Similarly the Intel processor also went through many developments and then it can load the 32-bit and or 64 bit together in the very much pronounced Pentium processor series which is continue still. The power of microprocessor not only increased in the way said earlier like execution of information in more bits together but also in the term of clock speed.


Now we should come back to our microcontroller perspective. The advancements in microcontroller was also done with the passage of time. Initially the microcontrollers were 8bits processing but later on the microcontrollers were designed to handle the number of more bits at the same time. Historically saying that, the Intel 8051, Intel MCS-51, was one of the first widely used microcontrollers. It was designed to work 8bit processing mode. It is well established in the industrial control market and automation of may machines. Then the PIC family came, it is challenging for the position of leading microcontroller type. It was manufactured by Microchip. It was launched with some additional feature at that time like easily re-programmable feature was very good for beginners.

Now by going through this whole discussion in this post and earlier posts, we hope it is easily convinced that the microcontrollers are very good to use for control application anywhere in general and in industry as well. Rest is that the only question remain arises is that which microcontroller may be used for a specific application to solve a problem. There are many factors which involves in addressing this very important question regarding the selection of the microcontroller for a certain task. In which the factor of costs is really very important. To select the cheapest device is of course logical, but it must match the application’s needs. Now a days it is learnt that the microcontrollers are tailored for specific applications too. However there is a wide variety of microcontrollers available in market to choose from.

microprocessor VS Microcontroller
various microprocessor characteristics comparison


Now we start it in a sequence, like first of all one should select the controller family means the vener or manufacture which more associated with the controller’s architecture. It may be noted that the microcontrollers a family controller contain the same processor core. These are code-compatible generally. The difference would be in the additional components/ feature like the number of timers or the amount of memory, PWM, USART, IOs etc. The different controller families like 8051, PIC, HC, ARM are as an example of good choice.

Microcontrollers specifications Comparison


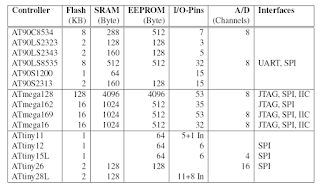
Figure  Comparison of AVR 8-bit Microcontrollers specifications AVR, ATmega, ATtiny, Intel MCS-51.

In the above table the data shows a selection of microcontrollers of Atmel’s AVR family. The thing all these microcontrollers have common is their AVR processor core. This family has 32 general purpose registers and executes most instructions within one clock cycle.

The next step is to choose the right microcontroller for the application under consideration within the selected family of microcontroller. Here the choice of microcontroller number wil be based upon the most basic features of the microcontrollers for example memory, digital and analog I/O, and interfaces, Timers, Interrupts, PWMs, USARTs etc. The chosen microcontroller will cover the hardware requirements of the application along with to estimate the application’s speed.

Description of Hardware Systems running inside Personal Computer PCs

 Hardware Systems running inside Personal Computer

The hardware of Personal Computers is normally based on the microprocessors made up of Intel™ series along with other associated components and the personal computers have also operating system software. The standard PC hardware is consisting of following components:


1.       The main unit which further consist of various boards inside it,

2.       The input devices like keyboard and mouse,

3.       The output devices like VDU (visual display unit) and if possibly a printer and

4.       An optional connection to a network.

5.       The circuit board which is also called the motherboard is mounted in the main unit.

The motherboard of PC includes a bunch of chips & IC and many other components on it. These components has to work together in order to provide required digital processing of data. The control of input and output devices is also carried out through this motherboard. The personal computer have suitable power supply module for the working of motherboard and the peripheral devices mounted in the main unit called central processing unit of personal computers. The motherboard comprises of the microprocessor chip (CPU), RAM the memory modules, BIOS ROM, ISD and keyboard mouse display interface.

The main Processor of PCs

The main processor is the heart of computer which has to run all software & programs loaded in the memory of CPU. The processor does and issues the commands to peripheral devices for useful work to be done by the whole hardware. The programs are stored on memory called hard disk inside the main unit or CPU. The function of hard disk is to hold all the data and useful information which is required to retain even the power to computer is off.

Programs inside PCs

 There are two main types of software of programs usually required for operation of computer:

1.       The operating system and

2.       The application

 These software or programs named operating system and application are stored at hard disk. The hard disk also stores the information and data created by operation of this software along with the data created by the user of computer in personnel desired location but by default in the document files. Whenever these documents are required to shift to other computers these are transferred to movable storage devices floppy disk , USBs etc.

Input and Output Devices of PCs

The information required to put in to PC, some suitable input hardware is required and similarly PC gives his results on suitable devices for these input and output hardware devices are attached with the computers. The keyboard is a input device because it is used for data input, and the VDU displays or Monitor screen is output device. For graphical input, the mouse is used which provides a very efficient input. The mouse operation is generally to be selected from menus or by clicking on icons and buttons. This is a typical example of the graphical user interface (GUI).

Network of Computers

If more than one computer is required to connect with each other for the sharing of data and information and resources of printer etc, a network is designed. For the effective communication of computers between each other over this network some suitable hardware additionally required like a network card, modem, data switches, dedicated communication cables etc. Some of these components are mounted inside CPS like modem or network card.

Compact Disks

A Compact Disk (CD) ROM drive is used for large data storage on optical disk. The CDs are media of information and data storage and backup as well because if required it can be read through CD drive. For example the application software once written can be stored on CD and can be re-installed when required.

Hardware of CPU

The motherboard has some slots for expansion boards and memory modules to be added to the CPU. The power supply and disk drives are mounted separately on the casing of CPU in the main frame. The interfaces and connectors of keyboard and mouse are usually directly on the motherboard. The PC architecture is also designed in such a way that it is well suited to industrial applications as well.


Hardware of Personal Computer CPU
Description of Hardware Systems running inside Personal Computer

RISC chips (reduced instruction set computer)

The RISC chips (reduced instruction set computer) are computer which have reduced hardware and are designed for limited operations under limited instruction set for example microcontrollers. The Single chip contains all necessary components to perform a dedicated task. Therefore where task is limited there is no need to use full computer one can go for single chip computers like system based on microcontrollers. The microcontroller can provide, in a simplified form, all the main elements of the conventional microprocessor system on a single chip.

The Microcontroller based Application Idea

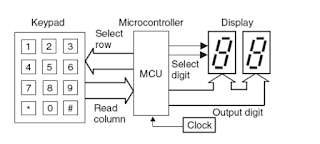
Here is one example of designing a system based on the use of microcontroller, we can see that the number of hardware components/ module are reduces and limited components are used to bring a useful task.

  • Here the input device is a keypad which consists of 3 * 4 switches called keypad matrix.
  • The output device is consisting of only two seven segments digits.
  • Remaining components: The oscillator and power supply.

Function of this MCU generic system:

 It can be any depending upon the requirements for example, we can input the data to system using keypad matrix very easily and the information is processed inside the microcontroller. The results will be displayed on the display unit, here in our case it is seven segment displays of two digits. Thus we have to processes the information accordingly so that it can use the available resources and work fine for indented purposes.

Typical Microcontroller application designs

Figure 2 The Microcontroller based application design includes the use of keypad display system.

The power supply requirement for this kind of system

The above microcontroller based system and like this many more other identical system normally works on DC +5V. The current consumption of this system is very low in the order of a few or up to hundred milliamps thus power supply load is very low. This system will run on a simple mobile charger. The mobile chargers are usually based on step-down transformer, Rectifier Bridge and capacitors filters, voltage regulators or now based on advanced switched mode power supplies.

Debugging MCU Code

Debugging

Of course it' i possible to develop a debug embedded applications with none special development and debugging tools, you just need how to download the program to the microcontroller and then debug it. Within the beginnings of microcontroller software development, which suggests the 70’s and early 80’s, this often was the tactic of choice: Debugging tools were rare, tools for different architectures often nonexistent. In consequence, the program was often developed on paper, burned into an EPROM, and then tested on the target hardware. Debugging, unavoidable in complex applications, was either through with external measurement equipment like logic analyzers, or realized through more or less creative use of the output elements on the target. as an example, targets generally contained some LEDs for status output, which were used for debug output during the debugging phase. Through them, the engineer visualized the program flow, indicating if and within which order the program reached certain memory addresses.
Since programming an EPROM took plenty of it slow, so-called ROM emulators resp. EPROM emulators were employed; these consisted of a RAM of the identical size, which used some additional logic to simulate the behavior of the ROM resp. EPROM within the target hardware, but was at the identical time externally accessible to facilitate programming. With these emulators, program and data can be directly downloaded from variety PC to the target hardware, much like we nowadays program storage. Such ROM emulators saved plenty of it slow, but didn't facilitate the debugging process itself. Still, it had been possible to debug applications this fashion, although it took lots of some time and patience. However, since a minimum of the previous tends to be briefly supply in any commercial project, efforts were made to facilitate the debugging process at an early age. Even so, the techniques utilized within the first years of embedded systems programming are still important in situations where no debugging environment is on the market (either because an exotic controller is getting used or because the controller remains too new be supported by a tool chain). it is also often the case that individuals who know the thanks to debug without tools are better at debugging (with or without tools) than people who have only learned to debug in elaborate debug environments. Therefore, we are visiting first provide you with an summary of techniques useful when no debugger is on the market, before we shift our concentration to the various debugging tools available today.
Before we advance to the varied debugging tools, allow us to think about what it's we'd like from a debugger. Any state-of-the-art debugger will offer breakpoints, that is, it'll allow the user to define points within the code where program execution should stop and control should be transferred to the debugger. Related to that is the single-stepping feature, which simply executes the code instruction by instruction. When control is with the debugger, the user generally wants to induce information about the state of the program. On top of the list is that the examination and modification of variable contents, followed by information about the decision history and also the parameters with which functions were called. So any debugging tool worth its salt should be ready to offer these features to the user. When developing for embedded and real-time systems, the timing behavior of the program and its interaction with the hardware become issues yet. So ideally, useful debuggers should also support the user during this regard.

Embedded Software and Hardware Architecture could also be a primary dive into understanding the embedded architectures and writing software to manage the hardware of the project under consideration. After having proper debugging tools and spending some time on learning of these tools will boost your experience in writing low-level firmware to directly interface hardware for efficient, readable and portable design practices smaller to bigger projects. But it all depends upon your focus and intentions that how much you spend time in programming and debugging the software along with associated electronics circuit boards. The Host Linux Machine for example is a machine where one can built and ran code under a simulated environment to an Integrated Development Environment. By using this kind of tool and platform one can build and install code directly on to ARM Cortex-M4 Microcontroller for testing the intended tasks. If a code developer tries various tasks and assignments for writing firmware to interact and configure the ARM architecture and then the MSP432 microcontroller platform then he can sure build a very successful application or system using these very power microcontrollers. The Texas Instruments Launch Pad with the MSP432 microcontroller are excellent choice for designing, debugging the microcontrollers based projects.

In-Circuit Debugging

In-circuit debugging (ICD) is the tool required by almost all microcontroller project developer because it is the most powerful fault-finding technique available for microcontrollers here all around. It allows the chip to be programmed and tested in circuit using the well know platform named MPLAB. The use of MPLAB along with the ICD enables the programmer to regulate or control the program execution within the actual target board or project board or prototype board where the microcontroller is being used. It means, now no need to pull off the MCU chip from board under consideration for programming and additionally you can test your code with the circumstances of the actual hardware. This can be obviously a serious advantage, because it allows the interaction of the PIC chip MCU with its hardware for complete testing than in an exceedingly purely software simulation. Microchip currently offers three main debugging interfaces which all support the entire range of PIC chips MCU. These debugging interfaces or tools possess the subsequent features like USB connection, Program download, read and verify, In-circuit debugging, Unconditional and conditional breakpoints, Register display and stopwatch timing etc etc.

Lets start with the PICkit3 is that the most cost-effective solution for non-professional developers, providing all the required features for learning and hobby applications in an exceedingly compact and easy-to-use package. It’s an enhanced version of PICkit2, operating at a USB full speed rate of 12 Mb/s. It uses the six-pin in-line board connector, which can normally connect direct to the project circuit. The ICD3 is more powerful, operating with high-speed USB (up to 480 Mb/s) to produce real-time ICD with maximum MCU clock rates and more complex breakpoint triggering options. It uses the six-pin RJ-11 connector, designed to attach on to chips that support ICD, or to a header board (see below) for those who don't.

It may be noted that the PICkitX means any of PICkit ( PICkit2 or 3) and ICDx programmers are both capable of supporting In-circuit debugging. However the smaller mid-range like 16FXXX chips, i.e. 16F690 chip don't support ICD internally. For these chips, ICD may be implemented instead by employing a header board connected between the ICD module and also the chip socket on the applying board. The header board carries a version of the target chip that includes the on-chip ICD circuitry, which substitutes for the target device while the system is under development (these chips aren't available separately). The ICD module sits in between the host PC running MPLAB IDE and also the application board MCU socket. When debugging is complete, the chip will be programmed to run independently and plugged directly into the board. The on-board reset circuit has been included to indicate how it's isolated from the VPP by a 1k0 resistors.

Other methods of debugging:

There are several other methods or techniques available for debugging the code for its actual behavior in its actual environment , some of these are like ICE (In Circuit Emulator), Simulators, use of proper LEDs or LCD for proper messaging. Among these the technique named In Circuit Emulator (ICE) is comparatively costly. The other are used defined which altogether depends upon the user field of interest. However the simulators are helpful at assembler level code verification. There are some simulators which will tell the project develop about how the code is taking or the clock cycles can be checked and some provide a stopwatch to check the execution time for a couple or bench of statements.
The UART or RS232 is also used for transferring some important results at some specific time for the debugging purposes. Mostly MCU have built in UART and at the other end project developer can build a custom hardware or can use PC as well. In Computer there are Hyper terminals software available which can transmit and received the messages on specified baud rate. Important things that the code developers have to write some extra lines of code which will be specific to only debugging point of view. When that situation arises the corresponding message can be read using hyper terminal on suitable computer through the interface of serial communication using RS232 serial communication protocol. It may also be noted that the serial communication using USART RS232 is very much slower as compared to USB interface. Using In circuit debugger based on USB technology is much faster. Rest is on the project developer that which method he adopts for debugging or totally don’t consider the debugging at once.

Memory of Microcontroller used in the development of Projects

 Memory Associated with Micro-controllers

The memory for microcontrollers is an important part. Here we will discuss the types of memories associated with microcontrollers. There are various memory types like RAM, ROM, and EEPROM etc. We will discuss all types of memories one by one.

Data Memory:

The MCU uses data memory to store the real time calculation results temporary which are normally available until the power is available to the system. The data that is stored in data memory is short-lived, but it will be valid for as long as the CPU is running. To store the useful results permanently the MCU needs some permanent memories. The microcontrollers have normally on-chip data memory.

Instruction Memory:

The instruction memory is that where the actual program instruction are stored and read one by one for the execution purposes. In microcontrollers the instruction memory is usually integrated right into the chip or MCU. This type of memory is the most prominent uses of memory in or around a CPU. In between the data memory and Instruction memory there are some other type of hardware memories used for data exchange between these two like registers, caches, various buffers etc. The size of such on-chip memory is limited. It is often not possible to expand this type of memory externally and sometimes as whole a n external memory is used but it increase cost and design complexity too. As the MCUs are most often used for relatively simple tasks and hence do not need excessive amounts of memory. Normally the data and instruction memory on the chip remain enough for general purpose projects which is the beauty of MCU. Therefore the total system cost is decreased considerably. The Different model and manufacturer of MCU usually provide different amounts of memory. The functional difference of memory types above is based on the way the memory is used in the project.

Therefore before designing a circuit of a project one should have to select the appropriate MCU for the application under consideration the memory of MCU is one of the critical parameters used in selection of right MCU.  So you can choose a particular MCU which offers the appropriate memory space for your project.

Other Types of memories:

  • Volatile memory
  • Non-volatile memory
  • Volatile memory

    Volatile means that the contents of the memory are gone or lost or not available as soon as the system’s power is switched off. Volatile memory can be static or dynamic memory. It means that the volatile memory retains its contents only so long as the system is powered on. The important feature of Volatile memories is that it is normally very fast, as the access time of volatile memories remains in order of nanoseconds range. The volatile memory is generally called RAM (Random Access Memory). RAM allowed direct access to any address or location of whole memory and at the same time one can only be read and written sequentially. The random access memory reflects the fact that, from the memory’s perspective, any ‘random’, i.e., arbitrary, address could be accessed.

    Static RAM

    The Static Random Access Memory (SRAM) is the first type of volatile memory to be widely used in the field of computers, microcontrollers and microprocessors. The SRAM chip consists of an array of cells called flip-flop, each flip-flop is capable of storing one bit of information. A flip-flop is used to store a bit of information which basically consists of multiple transistors and associated electronics components. One SRAM flip-flop has the inputs and outputs which are described as under:

    Data In Din: On this input, the flip-flop accepts the one bit of data to be stored.

    Data Out Dout: This output reflects the bit that is stored in the flip-flop.

    Read/Write:

    The R/W operation is possible using this input pin of flip-flop, the type of access or operation whether we want to read or write is specific to logical level on this pin. For example, the logical level 0 means the flip-flop is to be used for write operation means the bit is required to store into the flip-flop, i.e., the current state of Din will be stored in the flip-flop. The logical level, 1 means that the flip-flop is used to be read, so it should set Dout according to the stored value in flip-flop.

    Cell Select: The CS pin on flip-flop is used to select the chip for any operation it is enable or disable through logic levels. If the input signal on CS is logical 0, the flip-flop does not accept any data present at Din and keeps its output Dout in a so-called high resistance state, which in fact disconnects it from the rest of the circuit of the project where the memory is being used. On a rising edge, the flip-flop either accepts the state at Din as the new bit to store or it sets Dout to the currently stored value depends upon the requirement of operation through other input control signal like read or write pin.

    Non-volatile memory

    The Non-volatile means that the contents of the memory remain even if the system’s power is switched off. There is quite a variety of non-volatile memory types: ROM, PROM, EPROM, EEPROM, FLASH, NV-RAM etc. The non-volatile memories retain their content even when power is cut off as compared to above stated SRAMs and DRAMs. The non-volatile memory types are usually much slower as compared to the Volatile memory.

    ROM

    The Read Only Memories (ROMs) are the first types of non-volatile semiconductor memories. As the name indicates, it is read only memory and simply cannot be used for write operation. The vender or manufacture stores the data once during the manufacturing time; it cannot be changes by user after that. A common type of ROM is the called Mask-ROM (MROM). During the fabrication of MROM the vender normally uses masks in IC to create the layers in memory.

    PROM

    Programmable Read Only Memory (PROM) is basically matrices of memory cells, each containing a silicon fuse. Initially, each fuse is unbroken and every cell reads as a logical 1. By selecting a cell and applying a brief but high current pulse, the cell’s fuse is often destroyed, thereby programming a logical level 0 into the chosen cell. Sometimes, you'll encounter so-called just the once Programmable (OTP) microcontrollers. Those contain PROM as instruction memory on chip. PROMs and OTP microcontrollers are, of course, not suitable for development, where the content of the memory should still have to be changed. But once the event process is finished, they're well-suited for middle range production.

    EPROM

    Erasable Programmable Read Only Memory (EPROM) overcomes the drawbacks of ROM and PROM and facilitates the developer to alter the contents of program memory if required. The re-programming of EPROM is non-destructive. Memory is stored in field effect transistors (FETs), or rather in one in every of their pins called gate. It’s aptly named floating gate, because it is totally insulated from the remainder of the circuit. However, by applying an appropriately high voltage, it's possible to charge the floating gate via a physical process called avalanche injection. So, rather than burning fuses, electrons are injected into the floating gate, thus closing the transistor switch. Once a cell is programmed, the electrons should remain within the floating gate indefinitely. To program the EPROM, the developer should apply a special programming voltage to the EPROM, which is typically over the operating voltage. A UV source of illumination is required to erase EPROM.

    EEPROM

    The EEPROM (Electrically Erasable and Programmable ROM) has all the benefits of an EPROM with none additional arrangements. By using EEPROMs, we don’t need any special voltage which was required within the case of EPROMs for programming operations on that. Similarly no more UV source of illumination is required for erasing. The EEPROM works very kind of like EPROM, except that the electrons are aloof from the floating gate by applying an elevated voltage. a limited number of write/erase cycles only (usually within the order of 100000 cycles). EEPROMs are used quite regularly in microcontroller applications. One example where EEPROMs are best used is that the storage of calibration parameters.

    Flash

    Flash could be a variant of EEPROM where erasing isn't possible for every address, but just for larger blocks or maybe the complete memory (erased ‘in a flash’). thanks to the actual fact that it’s unimaginable to erase single bytes, Flash EEPROM is usually used for program, not data memory. The Flash-EEPROMs often have a lower write/erase cycle as compared to EEPROMs about 10 times lesser. 

    NVRAM

    The Non-Volatile RAM (NVRAM) may be a form of memory that mixes the benefits of volatile and non-volatile memories. a technique is to only add a little internal battery to an SRAM device, in order that when external power is changed, the SRAM still retains its content. Another variant is to mix a SRAM with an EEPROM in one package. Upon power-up, data is copied from the EEPROM to the SRAM. During operation, data is read from and written to the SRAM. When power is bring to a halt, the information is copied to the EEPROM.

    FAQ for Memory Organization of Microcontrollers:

    How to use the memory in the development of Microcontroller projects?

    As we know that the microcontrollers are a large-scale integrated chip system having the processor, the memory and interfaces of peripherals. Thus, the Microcontroller are used in the designing of an embedded system. The microcontrollers have built in memory with them. Like, the Microcontrollers have volatile memory named as Random Access Memory (RAM) and non-volatile memory like flash memory, and Erasable Programmable Read Only Memory (EPROM). Some microcontrollers have electrically Erasable Programmable Read Only Memory (EEPROM) with in the same chip if microcontroller. The construction of a microcontroller project involves the use of memory during the storage of program in microcontroller, execution of program during run time memory usage, and save the results into memory after performing some calculations. All three main usages as describes involve the use of memory in microcontrollers.

    How to manage memory in programmatically?

    The hex file is burned into microcontroller program memory ROM, code is run and executed in RAM, and temporarily changes in parameters are stored in EEPROM of microcontrollers.

    How do memory management consider in application development?

    Normally the microcontrollers have enough memory for small and medium size projects. The memory issues come in larger projects. Then appropriate microcontroller are selected which can hold large programs and additional external memories are attached with them.

    What are the main differences between the Microcontrollers and microprocessors?

    The microcontrollers do have their RAM, ROM, EEPROM with them on single chip and are ready to direct interface with real world through their input/ output port, requires less addition components to perform basic tasks. At the other hand the microprocessors need use of external RAM, external ROM, and external EPROMs. There are buses for communication between various memories and other external devices. The focus in microprocessor is on powerful computation abilities rather than smart design.

    Do the microcontroller have external memory interfaces?

    Normally the need of external memory is felt in bigger projects and microcontrollers have provisions to interface memories externally. When an embedded system has a microcontroller unit in it and program does not fit in the program memory of microcontroller, then additional memory is attached. In some cases, the microcontroller does not have program memory at all like the microcontroller from 8051 family number 8031 has no program memory on the chip. Now an external memory is necessarily interface with it to perform any task by these 8031 microcontrollers. Therefor we can say that the External memory interfacing in microcontroller involves interfacing external memory chips such as RAM and ROM to the any microcontroller for additional memory spaces. It will make easy the microcontroller to execute larger and more complex programs in complex operations. Thus, the external memory interfacing is connecting the memory chips to the microcontroller with its data bus and address buses. As we know that the data bus is to transfer data between the microcontroller and the memory and the address bus is for addressing the specific memory location within attached memory.

    Can we add external RAM to microcontroller?

    Yes, the external RAM chips can be added with the microcontroller using the interfaces like SPI or I2C.

    Which memory rating identifies the fastest memory?

    Overall in the all types of memories used in computer world the Cache memory is considered the fastest system memory. The Cache memory is built to keep up the CPU as it fetches and executes instructions very quickly. The data which is to be used most frequently by the CPU itself is stored in cache memory. The memory chips used for cache memory are Static Random Access Memory (SRAM).

    Do microcontrollers have memory?

    Yes the microcontrollers do have their own RAM, ROM with them.

    What is the History of Microcontrollers?

    Microcontrollers were first invented in the early 1970s and later on becoming commercially available around 1974. Gary Boone which is an engineer from Texas Instruments invented the initial concept of the microcontroller.

    What is program memory in microcontroller?

    The microcontroller requires two types of Memories for work which are the Program Memory and the Data Memory. The Program Memory stores the program which is consisting of the instructions to be executed by the CPU. The Program Memory is a Read Only Memory or ROM. On the other hand, the Data Memory is used to store the temporary value of various parameters, variables in the form of data while executing the program. The Data Memory is a Random Access Memory or RAM. program memory size of pic microcontroller

    What are the types of memories named nonvolatile memory?

    The nonvolatile memory are of five types. The names of nonvolatile memory are Flash Memory, Ferroelectric Random Access Memory (FeRAM), Magnetic Random Access Memory (MRAM), Phase Change Memory (PCM), and RRAM. Similarly these memories are also considered in the category of non-volatile memory like Read-Only Memory (ROM), Flash Memory, Magnetic Computer Storage Devices, Hard Disks, Floppy Discs, Magnetic Tape, Optical Discs, Paper Tape and Punched Cards.

    Can a microcontroller work on Linux?

    The Linux is an operating system used in larger microprocessor based computers. The use of Linux in microcontroller world is limited. So we say that the LINUX operating system as a larger operating system will not run on 8051, AVR, PIC Microcontroller, Cortex-M, or other similar sized microcontroller having similar kind of architectures. So to run Linux the minimum processer like ARM Cortex-A, ARM926EJ-S will be required. The important difference between processors and above said microcontroller is memory management. The microprocessors have a memory management unit (MMU) which the small microcontroller do not have with them. The Tiny Microcontroller on which the Linux can run is Jupiter Nano. Similarly the Raspberry Pi OS which is formerly known as Raspbian is an embedded system board which can run Linux.

    The developers and designers like to use Linux in embedded system due to some best features like LINUX is an open-source and also have good developer support by providing efficient tools. So up to this point one thing is very clear that the Linux is not a coding language for any kind of programming but it is an operating system (OS) which can support some embedded devices that are capable to run on an OS. Secondly the other thing is also well cleared that the LINUX runs on powerful processors like the Cortex A series, and the Raspberry Pi. Every project of embedded system will be starting with customizing, and deploying the toolchain, the bootloader, the kernel, and the root filesystem in LINUX. Interestingly one important thing to be shared here is that the 8088 family processor can also be used to run the Linux on them for limited tasks and operations as the capabilities of 8088 processors are not enough to handle the requirements of linux. There are some Linux systems having full vendor support but these need a have lots of memory, flash, MMC disk, SD card slot, PCI slots for wireless cards, HDMI outputs etc. For a prototype experiments the developer or designer may use  Raspberry Pi . After the maturity of application the own PCB having a mid range CPU with MMU, enough memory to run a standard system, enough flash to keep it can be designed. 

    What are the types of memory in microcontroller based project?

    The microcontroller have RAM, ROM and some of the microcontroller can have EEPROM with them. microcontroller memory organization,

    What is data memory in microcontroller?

    The RAM is the data memory of microcontroller.

    Which memory of the microcontroller stores the .hex file ?

    The ROM of microcontroller carries the information stored in hex file but in other format base on the microcontroller memory organization.

    Does a microcontroller need external memory?

    It has been already addressed in above question that the Microcontrollers may do not have enough internal memory for larger applications as the size of ROM/RAM is limited to design of microcontroller make & model. In these cases, external memory is necessary. 

    Embedded Systems and Microcontroller Programming for Beginners

    Introduction of the Microcontroller and Embedded Systems, designing of projects and Programming 

     In this post we discuss about the microcontroller, What is it?

    The microcontroller is very much similar to microprocessor having its own RAM and ROM within a single electronics chip called IC (integrated circuit). There are very few external components required to start operation of a simple project like crystal and power supply.

    The microcontroller production is in billions every year, it reflects their great use in many project and in many appliances. The controllers are integrated into many appliances like as follows:

    1.  The household appliances which includes microwave, washing machine, coffee machine TV, Radio, anything which is programmable or have some automatic intelligent features.
    2. The telecommunication sector like mobile phones
    3. The automotive industry like now modern vehicle have better fuel injection, ABS and other features which involve the use of microcontroller
    4. The aerospace industry
    5. The industrial automation, here many machine are now automatically operated by applying suitable programs through microcontrollers.

    The microcontroller is in short a true computer in a single chip. The designing of microcontroller have all the features of a microprocessor like CPU, ALU, PC, SP and other typical register associated with microprocessor additionally have its own built-in RAM and ROM. It is very much similar to the microprocessor to perform general purpose task with very limited components, someone have to fetch data in it to perform some calculation of that data and sometimes also control the real world parameters based on that data. The basis feature of microcontroller is to control the operation of a machine or system using information feed in a form of a program in it and this task may continue over the period of years. This complex narration can be explained in the simple form as under:

    Example from real world system

    Lets consider a heat control system in which we want to control the temperature of system or machine then what we will do...?  

    1. We will read the temperature from a temperature measuring device or simple sensor which will be something like analog value. This analog value should be digitized using analog to digital converter and then it will be read by our microcontroller.
    2. The measured temperature should be displayed on suitable device like LED seven segment digits or LCD .
    3.  We wish to feed the required temperature by means of some input devices, for this, keys are used with it.
    4. The microcontroller will read the running temperature, displays on its suitable output device and will also compares with the set point.
    5. It will the control heating according to the temperature by turning heater on/off accordingly.

    Thus we can say that the microcontroller is a type of microprocessor furnished in a single integrated circuit and needing a minimum of support of external components like other chips. The basic principal of a MCU is self-sufficiency and low cost. It is not intended to be used as a complex computing device in the conventional sense as personnel computers are or heavy duty processing units; that is, a microcontroller is not designed to be a data processing machine, but rather an intelligent core for a specialized dedicated system as described in above example. The Microcontrollers are embedded in many controls of real world physical parameters, monitoring, and processing systems. Some are general-purpose devices but most microcontrollers are used in specialized systems such as washing machines, telephones, microwave ovens, automobiles, and weapons of many kinds.

    You can find microcontrollers in all kinds of things these days. Any device that measures, stores, controls, calculates, or displays information is a candidate for putting a microcontroller inside. The largest single use for microcontrollers is in automobiles—just about every car manufactured today includes at least one microcontroller for engine control, and often more to control additional systems in the car. In desktop computers, you can find microcontrollers inside keyboards, modems, printers, and other peripherals. In test equipment, microcontrollers make it easy to add features such as the ability to store measurements, to create and store user routines, and to display messages and waveforms. Consumer products that use microcontrollers include cameras, video recorders, compact-disk players, and ovens.

     A microcontroller usually includes a central processor, input and output ports, memory for program and data storage, an internal clock, and one or more peripheral devices such as timers, counters, analog-to-digital converters, serial communication facilities, and watchdog circuits. More than two dozen companies in the world manufacture and market microcontrollers. They range from 8- to 32-bit devices. Those at the low end are intended for very simple circuits and provide limited functions and program space, while those at the high end have many of the features associated with microprocessors. The most popular ones include several from Intel (such as the 8051), Zilog (derivatives of their famous Z-80 microprocessor), Motorola (such as the 68HC05), Atmel (the AVR), Parallax (the BASIC Stamp), and Microchip.

    The microcontroller has periphery input output ports, timers, interrupts, watchdog timers, debuggers, communication protocols etc. The microcontroller have hardware structure too. All these will be discussed in later posts.

    Steps to develop a Microcontroller Project

    To develop a Project using microcontroller following Steps shall be perform

    Here we will discuss to put together a microcontroller in a project and see following several steps:

    1.       First of all define the task

    2.       Focus , how it is being performed in manual way

    3.       Design and build the electronics circuits

    4.       Write the control program

    5.       Test and debug

    Sometimes the steps won’t follow exactly in this order. You may begin writing your program before you build the circuits, or you may build and test some of the circuits before you start programming. But however you go about it, each of the above steps is part of the process. There are some tolls required to program the microcontroller includes compiler, assembler and program burner or called programmer. These will be discussed later in separate post.

    FAQ about Embedded Systems and Microcontroller Programming for Beginners:

    The following are some of the FAQ for the beginners to understand the processing of programming a microcontroller in the start. 

    what are the embedded systems?

    The embedded systems are electronics processing cards or module designed using microcontroller to solve one or more human problem efficiently. An embedded system includes a perfect set of electronics devices in right combination under a specific hardware design along with a software designed to perform a specific task. The Embedded systems are sometimes work as a sub system within a larger complex electronics and electrical system. The embedded systems are programmable and reprogrammable hardware units designed to solve a simple or a complex real-world problem. The common example of embedded system are like Industrial machineries, consumer goods based on electronics, agricultural & processing industry equipment, automobiles, Bio-medical devices, instruments & equipment, digital cameras, electronics watches, household electrical automatic equipment & appliances etc.

    What is the embedded systems engineering?

    In the field of embedded system engineering the mechatronics-based solution are offered to serve the mankind. The manual problem solving is replaced with automatic microcontroller or microprocessor-based systems.

    How and where to start the microcontroller programming?

    This is not a difficult task to program a microcontroller. In the start, most of the people remain upset. But the answer is very simple. Start with very simple project like try to write a program for microcontroller in which a LED is attached with a pin or port of MCU and it is required to turn ON and OFF.

    Can you please share with us the simple embedded systems examples?

    Yes of course, I can share some these. The very simple example a I write above is to control a device like LED, bulb, motor etc with microcontroller to make it function like turn it ON or OFF when a switch is press or at some frequency means periodic action. Similarly Interfacing LED seven segment display unit with microcontroller or development of digital clock using seven segment display or liquid crystal display (LCD). Development of Data acquisition units or modules like acquiring temperature through analog or digital temperature sensor. Use of analog to digital converters. Measurement of current, voltages and frequency of an alternating current source etc.

    What are the embedded programming languages?

    The list of embedded programming languages is very long including assembly language, basic, C / C++, etc.. But normally the embedded system are programed using high level language like C/C++.

    What is the methodology of programming a pic microcontroller for beginners?

    It is very simple task. You have to learn any of computer programming language like basic or c. Then you have to chose an appropriate compile where the program could be converted to hex file. The methodology of programming a PIC microcontroller is much different from any of other microcontroller in the world, it included the setting up the software, creating a new project & a new file for coding, and writting some very simple instruction in appropriate syntax based on the language and compiler your using for it to run some very common functions, test the configuration & instruction set and ensure everything is working fine enough, compile the program, convert it into HEX file, burn the HEX file into microcontroller, put the microcontroller in testing board or development board, power up the development board, test the hardware & software, if there is any modification required then make necessary changes in program coding and repeat the above steps.

    Which are the tools required for the microcontroller programming for beginners?

    The following tools set is required for beginners to have with then to start microcontroller programming: The compile and IDE, development board, programmer, a few electronics component, a suitable regulated power supply.

    which programming language is used for microcontrollers?

    It is assembly language, basic language, c language used for programming a microcontroller. Any of these can be used.

    Which are the software used for microcontroller programming?

    The software used for microcontroller programming are compiler and text editor, usually there are some IDE which have integrated compiler/ linker and text editor all in one.

    How to learn Arduino programming for beginners?

    Starting with simple project and then moving/ shifting to words intermediate level and then high level or complex level projects of Arduino board. The goal should be in mind of develop or beginner be that he should focus on leanings of Basic knowledge about principles, techniques in Arduino system for developing a project based on Arduino. The initial step in starting the programming of Arduino would be the downloading and installing the Arduino IDE on the personal computer or laptop. The Arduino IDE is open source and it can run on Windows, Mac OS X, and Linux platform. The Arduino programming language is a very simple programming language focusing on hardware of Arduino and it is very similar to the C language in syntax.

    Which is more often programming language used for microcontrollers?

    The programmers or personnel working on microcontroller use a variety of programming languages to program a microcontroller in embedded systems. The most common used languages for microcontroller include C, C++, Python, basic, and Java. Therefore, we can say that the programming languages used for microcontrollers are often assembly, basic, C/C++ etc., but it does not mean that one have to expert of these all languages at a time. If a developer knows any of above said programming language, then it is enough, he can do start microcontroller programming and he can develop projects based on microcontroller.

    Can we do the programming embedded systems in c and c++?

    Yes, we can do programming of embedded system in C/ C plus plus language with suitable complier and linker.

    What is embedded system development board?

    It is an electronic board having all necessary electronics devices and components mounted on it along with microcontroller or microprocessor to work together for doing various general-purpose lab experiments using microcontrollers or microprocessor. The embedded system development boards are normally the printed circuit boards which includes some hardware components like central processing unit (CPU), memory (optional), input/ output device and their interfaces, data likes & data buses, and provisions of interfaces to external resource for controlling or acquiring data to and from the board. The microcontroller or embedded system development boards are more often customized keeping in view the solution of some specific problem and the need of user. The engineers or hobby person can design a development board by themselves very specific to current assignment. It is considered that the development boards are designed by some experts for beginners to do some experiments for learning the hardware and software of the microcontrollers. The Common development boards are based on microcontroller of 8051family, ARM, FPGA, Atmel AVR, MicroChip PIC Microcontrollers, Arduino and DSP etc.
    Blog for Micro-Controller for Electronics Hobbyist

    Introduction of Hobby Projects based on Microcontroller:

     This blog: The Microcontroller Programming Solutions is a good source of literature related to electronics projects mostly based on the use of Embedded system i.e. the use of Microcontroller or Microprocessor as the main central processing units along with the other electronics devices, instruments, equipment and components which may includes the sensors, the display units, LED seven segment displays, The Liquid crystal displays, the moving message displays, computer screens etc. This is an open form blog for the interested people like scientists and engineers which have keen interest in the field of Embedded systems. Here we can help each others to develop various interesting projects based on microcontrollers of all kinds like microcontrollers of Atmel, MicroChip Microcontrollers and AVR microcontrollers. Here any one hobbyist can submit his project for the use of other and as well as any one interested can ask for help to develop his project successfully. Thus This blog is for following :

    1.  Hobbyist
    2. Students
    3.  Engineers
    4.  Industry

    Here we will provides best solution based on micro-controllers. 

    The projects will be developed using MCU and associated electronics.

    It will be the extension of one of the very famous blog on microcontroller named microcontroller51.blogspot.com

    What is about this Microcontroller Blog:

    In the beginning, as I am starting to write my First Post on this blog which is related to Microcontroller, my desire is to put my practical project one by one on this blog to technical assist the beginners in the form of tutorial of microcontroller. Thus, I name this blog for the hobbyist and learner of electronics and microcontrollers. This article is just introductory nature. Later post will be focusing of the microcontroller projects on this blog. This is platform where hobbyist and learner will get practical example projects of microcontroller, thus we can say that this blog is about the Best blog for the microcontroller on hobby projects.

    Why we need Microcontroller Development Board in the start:

    To develop microcontroller projects quickly, the best optimum choice is I think to use readily available but not much costly development boards offering all suitable capabilities and features. One we are going to choose a Development Board for Microcontroller, what we have or we should have questions and what we should have to think about like considering to buy Microcontroller Development Board, as many are available over internet to buy online. Usually I prefer the Microcontroller Development Board which has all necessary features for beginners like some electronics components shall be mounted on it along with availabilities of ports to connect something externally with the board, if need to connect a device with microcontroller.

    To develop a Microcontroller Hobby Project; What are basic components required to be available on Development board for beginners:

    The components which are necessarily required at the start of hobby project based on microcontroller are Push buttons, section buttons, resistors, capacitors, potentiometer, variable resistors, reset button, touch button, LEDs, port status LEDs, Alpha-numeric LCD, provision of connection for general purpose graphic LCD, Mikro-BUS header, programmer attachment, relays, optocouplers, Bluetooth module, finger print sensor, touch pad for graphical LCDs, to avoid the need of external hardware for programming there should be Integrated programming interfaces through USB port or at least using RS-232 serial communication although the use of serial programmers are now limited,  power supply connections with 05V regulator,  etc.

    Example of an inexpensive Microcontroller board to develop hobby projects for learner:

    One of the best choices I think would be the development board for PIC microcontrollers which I like to use is the Microchip’s 8-bit Curiosity Development Board. The microcontroller used at this board is a PIC16F1619 which developed by MicroChip. The board has a DIP socket for the placement of microcontroller consisting of 20 pin. The advantage of provision of this DIP socket on development board is to give provision to learner to change the microcontroller easily and to update the board with any microcontroller which has similarly PIN configurations. As we know that in 20 PIN package there are several Microcontroller developed by MicroChip have different features but same PINs for power supply and other connections. Thus the developer cab switch from one microcontroller to any other of similar number PINs very easily.

    Hobby Project Development board features offered by 8-bit Curiosity:

    The important features of microcontroller board are summarized as ; PIC16F1619 compatible microcontroller usability, this microcontroller has some important features which are not common in many other 8-bit microcontrollers made by other manufactures like it has 1 KB of RAM, 8K 14-bit words (14 KB) of program storage, four Configurable Logic Cells, Multiple serial communications: EUSART, SPI, I2C, Complementary Waveform Generator, two Capture or Compare or PWM modules, Math accelerator with PID controller, two Signal measurement Timers which offers 24-bit timer or counter with Pre-scaler, Cyclic Redundancy Check, angular timer, three 8-Bit Timers/ counter and many more features. There are a lot of facilities which can be programmed to have interesting experience.

    Other suitable options to start a Microcontroller Hobby Project:

    There are many options available over internet which can be considered like development board which are made to use Atmel microcontrollers like 8051 family, the development board made for the use of AVR microcontrollers. The Arduino boards are also good choice, these boards normally use AVR microcontroller like Atmega8, atmge16 or atmge32. There is an important parameter which is called coast. Thus, one should consider his budget also. The PIC microcontroller 16F84 is also a good choice and I like it also to develop some tiny or small microcontroller projects.  It is a low cost and basic microcontroller in a 14pin package. It can be purchased anywhere for less than $2. I have developed many small microcontroller project using PIC16f84 processor, similarly I have used a variety of Arduino boards like Arduino Trinket, Arduino RS232, Arduino Diecimila, Arduino Duemilanove, Arduino Uno SMD, Arduino Leonardo, Arduino pro micro, Arduino Mega, Arduino Nano, Arduino UNO, Arduino Ethernet, Arduino Due, Arduino LilyPad, many of more.

    Common Uses or General Application of Arduino or any Microcontroller:

    There are a variety of application which can be developed using microcontroller made of Atmel 8051 family, PIC by MicrChip or Atmel AVR, etc like some are listed below which will be constructed and developed in later post of this microcontroller blog:

    • Development of a handheld game console
    • Designing the project based on microcontroller to control the graphical LCD
    • Construction of a MIDI controller device like mimics the Monome
    • Digital Thermometer
    • Autopilot for drone
    • Microcontroller based weather station
    • ArduSat, a cubesat based on Arduino
    • Microcontroller based event counting machine
    • C-STEM Studio, a platform for learning of computing, science, technology, engineering, and mathematics Development of robots, toy cars, helicopters etc
    • Industrial use of microcontroller, like development of various type of panel meters for the measurement of voltage, current and frequency of power sources.
    • Yard-meter (Ghazana Meter) to measure the length of cloth being produced in textile industry
    • Data loggers for scientific research
    • Development of a trip computer that uses the on-board diagnostics interface found in most modern cars
    • Fabrication of electric vehicle
    • Construction of automatic wheel chair
    • Construction of incubator

    Point under consideration while Designing of a Microcontroller Project:

    The designing a project based on microcontroller needs proper homework which start from thinking and ends on thinking, the important steps involved in this procedure are as under:

    • Identification of problem
    • Think about how it is being done manually
    • Try to automate it on paper
    • Try to choose the electronics components
    • Try to develop its schematic circuit diagram,
    • Try to write its program
    • Build the program into Microcontroller using suitable programmer
    • Test the program with real parameters and modify it.
    • Finalize the project on standard PCB.
    Good luck to all learner and hobbyist coming on my microcontroller blog, you can explore the hobby project based microcontroller by looking at different post. I will usually put one project in one post. You are welcome to comment and please give feedback. Thanks

    Popular Post (All Time)